For Classmethod Members Only: Batch registration of multiple AWS accounts
Batch registration of multiple AWS accounts
Section titled “Batch registration of multiple AWS accounts”Customers who are members of our Class Method Members service can use the function that allows multiple AWS accounts to be linked together at once. If you have many AWS accounts that you want to link with opswitch, you can use this function to start using opswitch smoothly.
How multiple AWS accounts can be linked at once
Section titled “How multiple AWS accounts can be linked at once”Use AWS CloudFormation StackSets to create IAM roles that can be assumed by opswitch in multiple AWS accounts, and register them in opswitch as AWS account linkage information. The registered AWS account linkage information is associated with one organization.
Advance preparation
Section titled “Advance preparation”The AWS account in which you create StackSets must be an AWS Organizations managed account or a self-managed managed account. The target AWS account must be an AWS Organizations account or a self-managed target account. For more information, please refer to the following AWS User Guide.
Activate trusted access for your stack set using AWS Organizations
Granting self-managed permissions
procedure
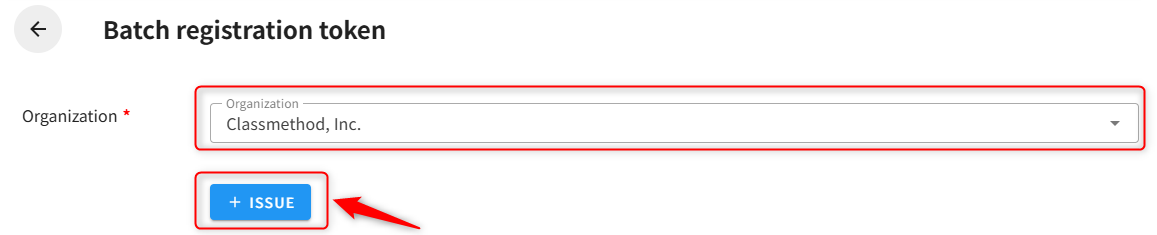
Section titled “procedure”Issue a Batch registration token
Section titled “Issue a Batch registration token”To integrate multiple AWS accounts at once, issue a bulk integration token. Tokens can be issued for each organization and opswitch user, and are valid for 7 days from issuance. Bulk integration tokens can only be issued to users who have an email address that matches the email address registered in the Classmethod Members Portal. Note that opswitch integration of Classmethod ID is not required.
- Click “Settings” - “Linked AWS Accounts” in the header menu.
- Click “Batch REGISTRATION TOKENS” on the top right of the AWS Account linkages page. You will not be able to click this if you do not belong to an organization with owner privileges.

- Click the “ISSUE” button in the upper right of the Batch registration Tokens page. If the email address of the user does not match the email address registered in the Class Method Members Portal, you will not be able to click the Issue button.
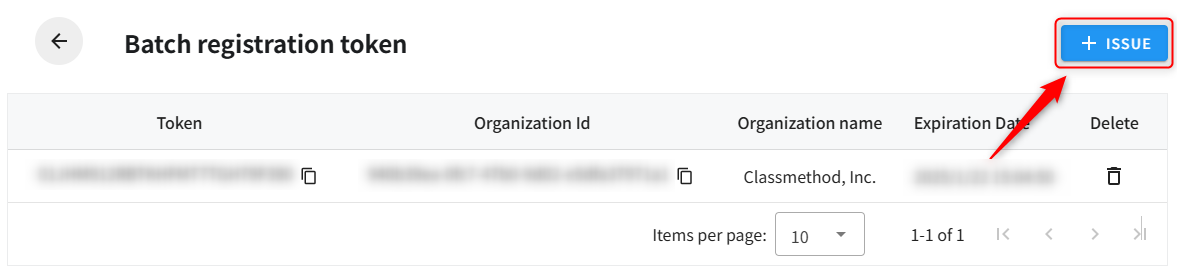
- Select the organization to which you want to publish and click the Publish button.
Create a stack set in the management account
Section titled “Create a stack set in the management account”Create a stack set from the AWS Management Console, create IAM roles for multiple AWS accounts, and register account integration information with opswitch.
-
Open the CloudFormation Management Console for your management account.
-
Select StackSets from the left navigation and click Create StackSet .
-
In Step 1: Select a template , enter the following URL for Amazon S3 URL: https://pmj-bucket-prd.s3.ap-northeast-1.amazonaws.com/templates/opswitch_stackset_access_role_11_0.yml
-
In Step 2: Specify StackSet details , enter the following details:
Input items Input Value StackSet name Register any name. Parameter OrganizationId Specify the Opswitch Organization ID to be integrated. Copy and paste the value on the Bulk Integration Token List page. Parameter StackSetsToken Specify the bulk integration token. Copy and paste the value on the Bulk Integration Token List page. Parameter opswitchAccountID Specify 444411381513. (Fixed value) -
Step 3: Check the following checkboxes in the StackSet options settings :
- I acknowledge that AWS CloudFormation might create IAM resources with custom names.
- I acknowledge that the following capability may be required by AWS CloudFormation: CAPABILITY_AUTO_EXPAND
-
In Step 4: Configure deployment options , enter the following details:
Input items Input Value account Specify the AWS account to be linked. Multiple accounts can be specified by separating them with commas. You can also specify them using a CSV file. Specifying a region Select Asia Pacific (Tokyo). Deployment options Specify the number of parallel processes and the conditions for when an error occurs (optional). -
Step 5: Review your information and click the “Submit” button.
-
When all stack instances in the stack set are SUCCEEDED, the process is complete.
Check the created AWS account integration
Section titled “Check the created AWS account integration”Log in to opswitch and check the AWS account integration that was created.
- Click “Management” - “Integrate AWS Account” from the header menu.
- Verify that the AWS account that created the stack is added to the list.
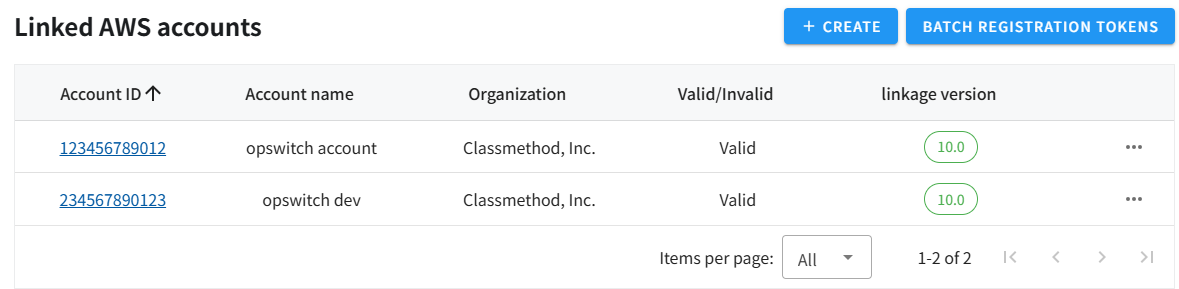
- You can change your account name and organization by clicking the account ID link.
About resources created by stack sets
Section titled “About resources created by stack sets”The following resources will be created in the account you specified:
| Logical ID | type | explanation |
|---|---|---|
| LambdaExecutionRole | AWS::Lambda::Function | Execution role of the Lambda function to call opswitch’s bulk integration API |
| ExternalApiLambdaFunction | AWS::IAM::Role | Lambda function to call opswitch’s bulk integration API |
| ExternalId | Custom::ExternalApiResource (CloudWatch Logs Log Stream) | Custom resource that calls opswitch’s bulk integration API |
| Register | Custom::ExternalApiResource (CloudWatch Logs Log Stream) | Custom resource that calls opswitch’s bulk integration API |
| opswitchRole | AWS::CloudFormation::Stack | AWS account integration stack |
| IAMRole | AWS::IAM::Role | IAM role used by opswitch jobs |
| AllowActionPolicy | AWS::IAM::ManagedPolicy | The permission policy attached to the IAM role used by the opswitch job. |
| DenyActionPolicy | AWS::IAM::ManagedPolicy | Deny policy attached to the IAM role used by opswitch jobs |
After the creation is successful, you can safely delete the LambdaExecutionRole, ExternalApiLambdaFunction, ExternalId (CloudWatch Logs log stream), and Register (CloudWatch Logs log stream).
Other notes
Section titled “Other notes”- A Lambda function is created in each AWS account. This Lambda function is used to facilitate API communication between your AWS account and opswitch. When the Lambda function is executed as a custom resource, a log stream is automatically created in CloudWatch Logs. This will incur costs for the Lambda function execution and CloudWatch Logs usage in your AWS account.
- No resources will be created in the management account. If you want to integrate the management account with opswitch, specify it as one of the target accounts in the stack set. When running in a self-managed environment, you can grant permission to one of the accounts you want to create AWS account integration for as the management account, and include that account ID in the stack set. In that case, the management account also needs a service role that trusts your account.
- To delete a stack set, first delete all of the individual stacks in the CloudFormation Management Console, then delete the stack set itself.
Deleting CloudFormation StackSets - AWS CloudFormation - To change the name or organization of an integrated AWS account, log in to opswitch and change the
account name or organization on the screen. - You may need to add permissions to use new features. IAM roles created through bulk integration cannot be updated from the opswitch screen. To update, you need to update using a stack set.
- If you have deleted an IAM role or stack, you can re-link each account from the Opswitch screen.
- If you encounter any errors during the linking process, please contact us via the Members Portal. https://v2.members.classmethod.net/